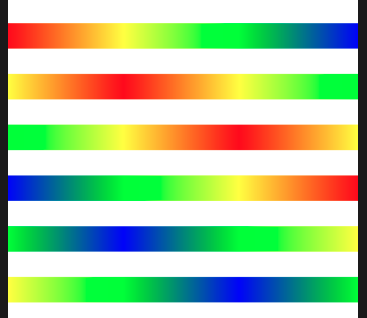
最近研究了一下一个彩色渐变的加载效果

https://github.com/HotWordland/GradientLoadingBar
主要的实现思路: CAGradientLayer + CAKeyframeAnimation 不停改变 CAGradientLayer 的 locations
看代码
    /// Generates the colors used on the gradient-layer.
    ///
    /// Example for   `gradientColors      = [.red, .yellow, .green, .blue]`
    /// and therefore `gradientLayerColors = [.red, .yellow, .green, .blue, .green, .yellow, .red, .yellow, .green, .blue]`
    ///
    /// - Note: Declared `static` so we can call this method from the initializer, before `self` is available.
    private static func makeGradientLayerColors(from gradientColors: [UIColor]) -> [CGColor] {
        // Simulate infinite animation - Therefore we'll reverse the colors and remove the first and last item
        // to prevent duplicate values at the "inner edges" destroying the infinite look.
        let reversedColors = gradientColors
            .reversed()
            .dropFirst()
            .dropLast()

        let infiniteGradientColors = gradientColors + reversedColors + gradientColors
        return infiniteGradientColors.map { $0.cgColor }
    }
首先是颜色部分 如果有 .red, .yellow, .green, .blue 这几种颜色来渐变 那么 用于 CAGradientLayer效果的颜色就是
[.red, .yellow, .green, .blue, .green, .yellow, .red, .yellow, .green, .blue] 这里源码也给出了实现方式
接下来 locations部分
 /// Generates the locations-matrix used for animating the current `gradientColors`.
    ///
    /// Example for   `gradientColors      = [.red, .yellow, .green, .blue]`
    /// and therefore `gradientLayerColors = [.red, .yellow, .green, .blue, .green, .yellow, .red, .yellow, .green, .blue]`
    /// ```
    ///  i | .red | .yellow | .green | .blue | .green | .yellow | .red | .yellow | .green | .blue
    ///  0 | 0    | 0       | 0      | 0     | 0      | 0       | 0    | 0.33    | 0.66   | 1
    ///  1 | 0    | 0       | 0      | 0     | 0      | 0       | 0.33 | 0.66    | 1      | 1
    ///  2 | 0    | 0       | 0      | 0     | 0      | 0.33    | 0.66 | 1       | 1      | 1
    ///  3 | 0    | 0       | 0      | 0     | 0.33   | 0.66    | 1    | 1       | 1      | 1
    ///  4 | 0    | 0       | 0      | 0.33  | 0.66   | 1       | 1    | 1       | 1      | 1
    ///  5 | 0    | 0       | 0.33   | 0.66  | 1      | 1       | 1    | 1       | 1      | 1
    ///  6 | 0    | 0.33    | 0.66   | 1     | 1      | 1       | 1    | 1       | 1      | 1
    /// ```
    ///
    /// - Note: Declared `static` so we can call this method from the initializer, before `self` is available.
    private static func makeColorLocationMatrix(gradientColorsQuantity: Int,
                                                gradientLayerColorsQuantity: Int) -> ColorLocationMatrix {
        let matrixHeight = gradientLayerColorsQuantity - gradientColorsQuantity + 1
        let range = 0 ..< matrixHeight

        return range.reduce(into: ColorLocationMatrix(repeating: [], count: matrixHeight)) { gradientLocationMatrix, row in
            gradientLocationMatrix[row] = Self.makeColorLocationRow(index: row,
                                                                    gradientColorsQuantity: gradientColorsQuantity,
                                                                    gradientLayerColorsQuantity: gradientLayerColorsQuantity)
        }
    }
对于 locations 不熟悉的可以看下 https://blog.csdn.net/a18339063397/article/details/87074501 或者看下苹果的官方文档 百度一下 都可以 简单的理解就是每种颜色对应的显示位置 0代表开始 1就是结束位置
这里用 OC 简单写了一下分解
    //模拟一下运动过程
    ^(){
        /**
         第一次运动 也就是
         gradientLayer.locations = @[@0,@0,@0,@0,@0,@0,@0,@0.33,@0.66,@1];
         后面的 0的颜色 会把 前面的0的颜色 遮盖
         */
        CAGradientLayer *gradientLayer = [CAGradientLayer layer];
        gradientLayer.frame = CGRectMake(0, 0, screenWidth, 30);
        gradientLayer.colors = @[(id)[UIColor redColor].CGColor,(id)[UIColor yellowColor].CGColor,(id)[UIColor greenColor].CGColor,(id)[UIColor blueColor].CGColor,(id)[UIColor greenColor].CGColor,(id)[UIColor yellowColor].CGColor,(id)[UIColor redColor].CGColor,(id)[UIColor yellowColor].CGColor,(id)[UIColor greenColor].CGColor,(id)[UIColor blueColor].CGColor];
        gradientLayer.locations = @[@0,@0,@0,@0,@0,@0,@0,@0.33,@0.66,@1];
        gradientLayer.startPoint = CGPointMake(0, 0.5);
        gradientLayer.endPoint = CGPointMake(1, 0.5);
        UIView *v = [[UIView alloc] initWithFrame:CGRectMake(0, 200, screenWidth, 30)];
        [v.layer addSublayer:gradientLayer];
        [self.view addSubview:v];
    }();
    ^(){
        /**
        第二次运动 也就是
        gradientLayer.locations = @[@0,@0,@0,@0,@0,@0,@0.33,@0.66,@1,@1];
        可以看见之前第一次最右边的蓝色没有了 整体向右移动了一个颜色
        */
        CAGradientLayer *gradientLayer = [CAGradientLayer layer];
        gradientLayer.frame = CGRectMake(0, 0, screenWidth, 30);
        gradientLayer.colors = @[(id)[UIColor redColor].CGColor,(id)[UIColor yellowColor].CGColor,(id)[UIColor greenColor].CGColor,(id)[UIColor blueColor].CGColor,(id)[UIColor greenColor].CGColor,(id)[UIColor yellowColor].CGColor,(id)[UIColor redColor].CGColor,(id)[UIColor yellowColor].CGColor,(id)[UIColor greenColor].CGColor,(id)[UIColor blueColor].CGColor];
        gradientLayer.locations = @[@0,@0,@0,@0,@0,@0,@0.33,@0.66,@1,@1];
        gradientLayer.startPoint = CGPointMake(0, 0.5);
        gradientLayer.endPoint = CGPointMake(1, 0.5);
        UIView *v = [[UIView alloc] initWithFrame:CGRectMake(0, 260, screenWidth, 30)];
        [v.layer addSublayer:gradientLayer];
        [self.view addSubview:v];
    }();
...
模拟器:

实际上 就是现有的显示的颜色往后面移动 然后 原来locations位于 0的颜色就可以得以显示 最终得到这样的效果