
.m
//bar的宽度
#define kLineHeight 3


/**
 创建刘海屏的bezierPath
*/
-(UIBezierPath *)createNotchPath
{
    NotchBarConfig *config = [NotchBarConfig new];
    CGFloat lineHeight = kLineHeight;
//    CGFloat containerHeight = 2 * config.smallCircleRadius + config.largeCircleRadius + lineHeight;
    CGFloat screenWidth = [UIScreen mainScreen].bounds.size.width;
    CGFloat leftNotchPoint = (screenWidth - config.notchWidth) / 2 + 0.5;
    CGFloat rightNotchPoint = (screenWidth + config.notchWidth) / 2;
    CGFloat smallCircleDiameter = 2 * config.smallCircleRadius;
    UIBezierPath *bezierPath = [UIBezierPath bezierPath];
    [bezierPath moveToPoint:CGPointMake(0, 0)];
    // Draw line to small-circle left to `leftNotchPoint`.
    [bezierPath addLineToPoint:CGPointMake(leftNotchPoint - config.smallCircleRadius, 0)];
    // Draw the small circle left to the `leftNotchPoint`.
    // See <https://developer.apple.com/documentation/uikit/uibezierpath/1624358-init#1965853> for the definition of the
    // angles in the default coordinate system.
    [bezierPath addArcWithCenter:CGPointMake(leftNotchPoint - config.smallCircleRadius, config.smallCircleRadius) radius:config.smallCircleRadius startAngle: -M_PI / 2 endAngle:0 clockwise:true];
    // We're moving the the large-circles a bit up.
    // This prevents having a straight line between the circles.
    // See <https://medium.com/tall-west/no-cutting-corners-on-the-iphone-x-97a9413b94e>
    CGFloat verticalOffsetForLargeCircle = 3;

    // Draw the large circle right to the `leftNotchPoint`.
    [bezierPath addArcWithCenter:CGPointMake(leftNotchPoint + config.largeCircleRadius, smallCircleDiameter - verticalOffsetForLargeCircle) radius:config.largeCircleRadius startAngle: M_PI endAngle:M_PI / 2 clockwise:false];
    // Draw line to large-circle underneath and left to `rightNotchPoint`.
    [bezierPath addLineToPoint:CGPointMake(rightNotchPoint - config.largeCircleRadius, smallCircleDiameter + config.largeCircleRadius - verticalOffsetForLargeCircle)];
    // Draw the large circle left to the `rightNotchPoint`.
    [bezierPath addArcWithCenter:CGPointMake(rightNotchPoint - config.largeCircleRadius, smallCircleDiameter - verticalOffsetForLargeCircle) radius:config.largeCircleRadius startAngle:M_PI / 2 endAngle:0 clockwise:false];
    // Draw the small circle right to the `rightNotchPoint`.
    [bezierPath addArcWithCenter:CGPointMake(rightNotchPoint + config.smallCircleRadius, config.smallCircleRadius) radius:config.smallCircleRadius startAngle:M_PI endAngle:M_PI + M_PI / 2 clockwise:true];
    // Draw line to the end of the screen.
    [bezierPath addLineToPoint:CGPointMake(screenWidth, 0)];
    // And all the way back..
    // Therefore we always have to offset the given `height` by the user.
    // To visually align the height with the "basic" `GradientLoadingBar`, we have to add one point here.

    CGFloat height = lineHeight + 1;
    // Have the small-circle at the bottom-path only one third of the size of the upper-path produced visually better results.
    CGFloat bottomPathSmallCircleRadius = config.smallCircleRadius / 3;
    // Moving the bottom-line in the corners of the small circles just a tiny bit away from the center point to the smartphone corners,
    // produced a visually more equal height for the gradient-view.
    CGFloat bottomPathHorizontalOffsetForSmallCircle = 0.5;
    // Moving the bottom-line just a tiny bit down here produced a visually more equal height for the gradient-view underneath
    // the smartphone-frame in the ears and the notch.
    CGFloat bottomPathVerticalOffsetForLargeCircle = 0.5;
    // Start by moving down at the end of the screen.
    [bezierPath addLineToPoint:CGPointMake(screenWidth, height)];
    // Draw line to small-circle right to `rightNotchPoint`.
    [bezierPath addLineToPoint:CGPointMake(rightNotchPoint + bottomPathSmallCircleRadius, height)];
    // Draw the small circle right to the `rightNotchPoint`.
    // We're offsetting the center-point with the given user-height here.
    [bezierPath addArcWithCenter:CGPointMake(rightNotchPoint + bottomPathSmallCircleRadius + height + bottomPathHorizontalOffsetForSmallCircle, bottomPathSmallCircleRadius + height) radius:bottomPathSmallCircleRadius startAngle:-M_PI / 2 endAngle:-M_PI clockwise:false];
    // Draw the large circle left to the `rightNotchPoint`.
    // We're using the same center-point as the large-circle above, but with a larger radius here.
    [bezierPath addArcWithCenter:CGPointMake(rightNotchPoint - config.largeCircleRadius, smallCircleDiameter - verticalOffsetForLargeCircle + bottomPathVerticalOffsetForLargeCircle) radius:config.largeCircleRadius + height startAngle:0 endAngle:M_PI / 2 clockwise:true];
    // Draw line to large-circle underneath and right to `leftNotchPoint`.
    [bezierPath addLineToPoint:CGPointMake(leftNotchPoint + config.largeCircleRadius + height, smallCircleDiameter + config.largeCircleRadius - verticalOffsetForLargeCircle + height + bottomPathVerticalOffsetForLargeCircle)];
    // Draw the large circle right to the `leftNotchPoint`.
    // We're using the same center-point as the large-circle above, but with a larger radius here.
    [bezierPath addArcWithCenter:CGPointMake(leftNotchPoint + config.largeCircleRadius, smallCircleDiameter - verticalOffsetForLargeCircle + bottomPathVerticalOffsetForLargeCircle) radius:config.largeCircleRadius + height startAngle:M_PI / 2 endAngle:M_PI clockwise:true];
    // Draw the small circle left to the `leftNotchPoint`.
    // We're offsetting the center-point with the given user-height here.
    [bezierPath addArcWithCenter:CGPointMake(leftNotchPoint - bottomPathSmallCircleRadius - height - bottomPathHorizontalOffsetForSmallCircle, bottomPathSmallCircleRadius + height) radius:bottomPathSmallCircleRadius startAngle:0 endAngle:-M_PI / 2 clockwise:false];
    [bezierPath addLineToPoint:CGPointMake(0, height)];
    [bezierPath closePath];
    return bezierPath;
}
代码的背后
这里主要是从一个渐变加载效果代码找出来的 , 源代码是 swift的 这里根据我的项目改成了OC 可以从注释中看到
这里有一些背后的东西的
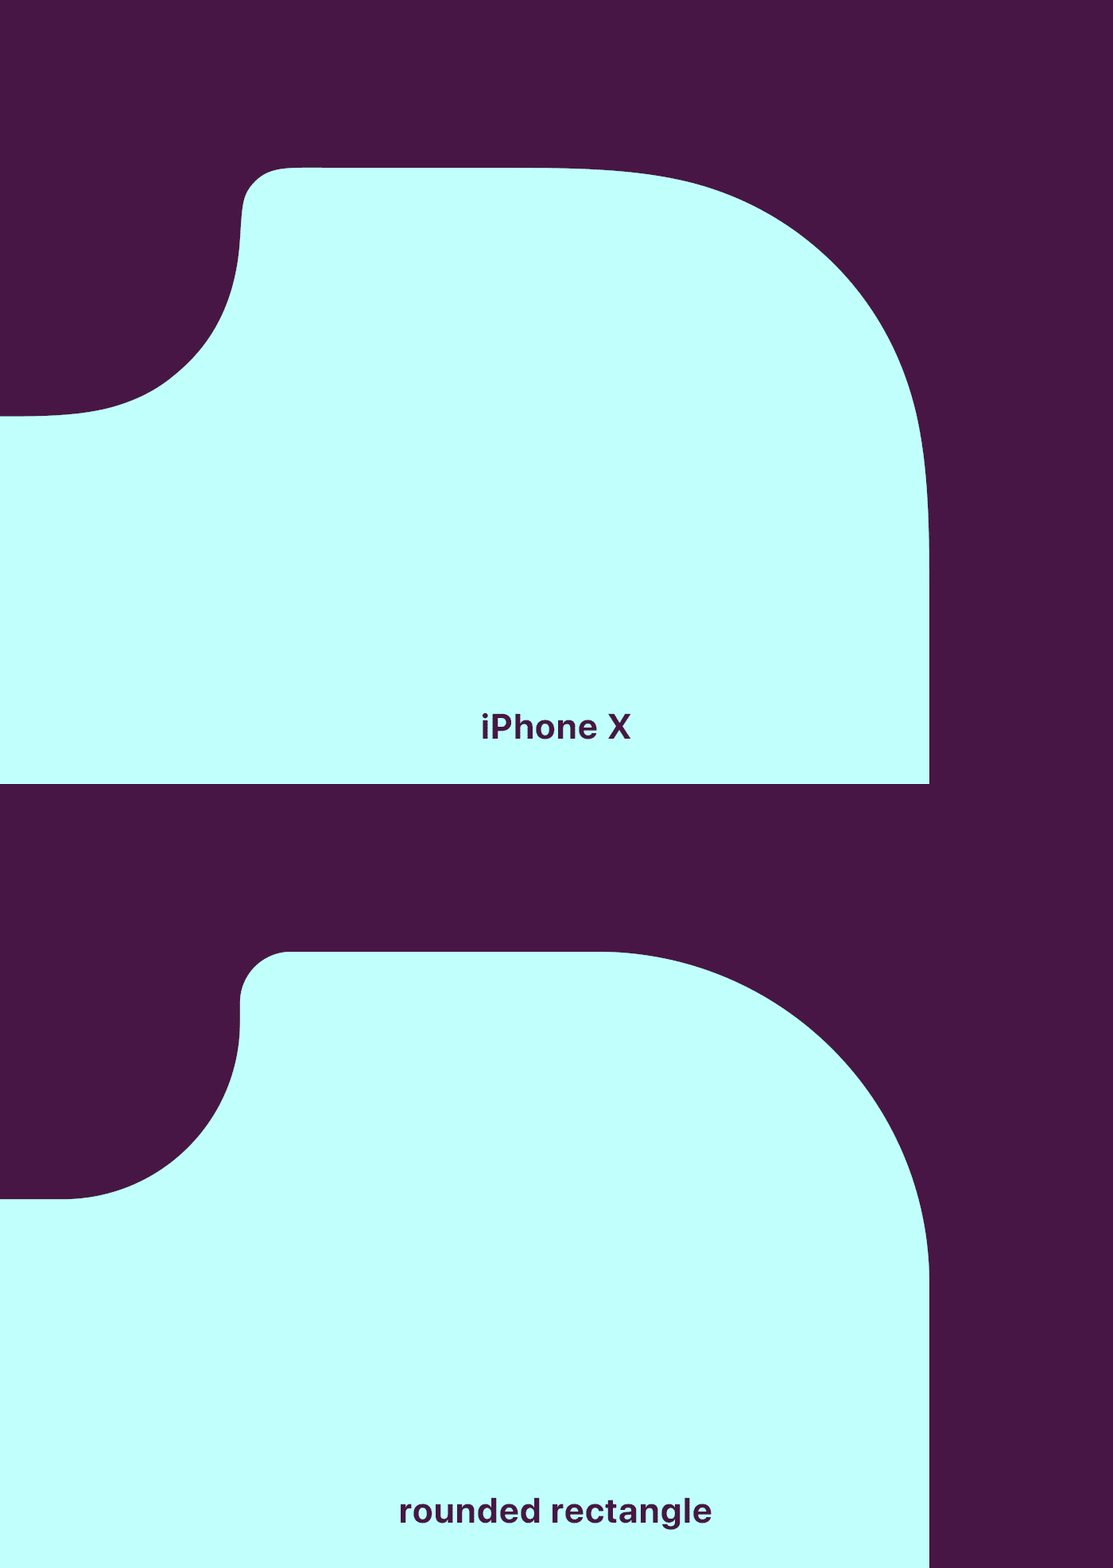
文章中主要阐述 苹果产品中的这个 圆 circle 比较特殊 是一种叫 连续弯曲 这个不只是刘海上 只要是涉及到苹果的产品
都可以看到 我默默的看了一下 我身边的 mac mini
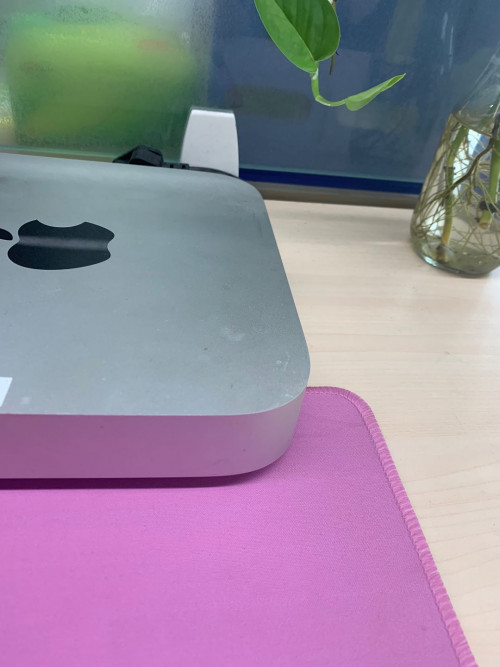
这里有篇文章提到 这个 连续弯曲
https://hackernoon.com/apples-icons-have-that-shape-for-a-very-good-reason-720d4e7c8a14
截取一下其中重要的信息
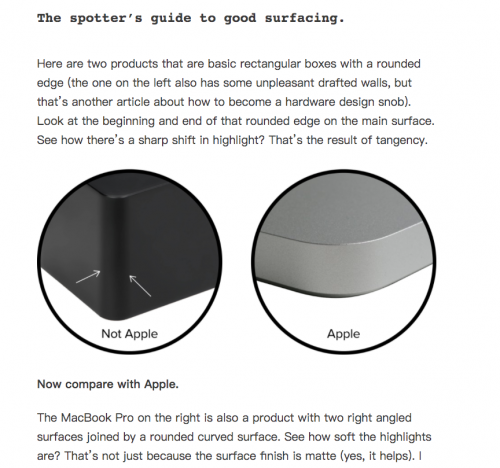
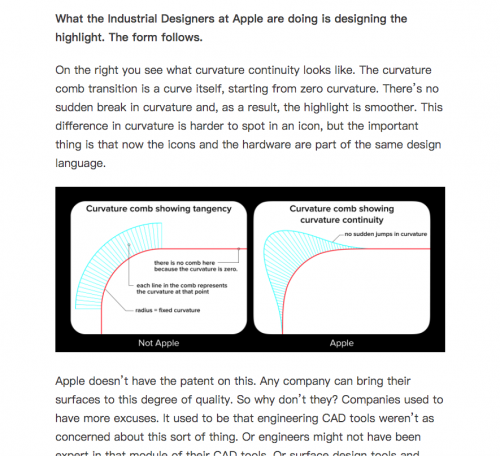
给人的感觉就是 弯曲到直线的时候是非常平滑的没有突兀的地方
代码中怎么实现呢 这里参考的 paintcode 的文章
https://www.paintcodeapp.com/news/iphone-x-screen-demystified
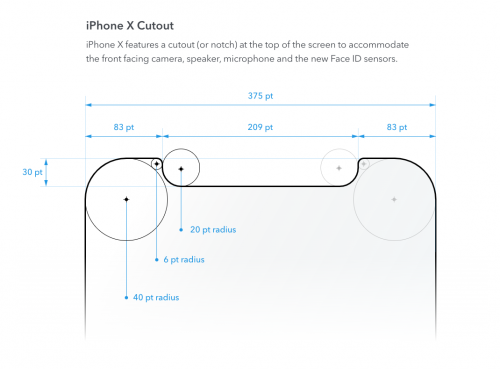
由多个圆组成 长短半径勾画弧 来组成这个path